Fool-Proof Sourdough Bread Recipe
No other recipe has brought me as much joy as my first loaf of sourdough. A fool-proof recipe to make the perfect fluffy, yet crispy sourdough bread!
Ingredients
For the leaven:
- 1 tablespoon active sourdough starter
- 1/2 cup bread flour (AP works too)
- 1/3 cup water
For the dough:
- 2.5 cups water divided
- 1 tablespoon salt
- 5.5 cups bread flour (AP works too)
Instructions
- The night before you make the dough, combine the leaven ingredients in a large bowl and mix until evenly combined. Cover and let stand at room temperature overnight.
- The next morning, check the leaven. If the surface of the leaven is super bubbly, it's ready! You can also drop a small spoonful of the leaven in a cup of water; if the leaven floats, it's ready!
- Combine 1/4 cup of warm water and the salt in a small bowl, stirring until all the salt is dissolved. Set aside.
- Add the remaining 2 1/4 cups of water to the bowl with the leaven. Stir to break up and dissolve the leaven into the water. It's OK if the leaven doesn't fully dissolve.
- Add the flour to the mixture and stir with a rubber spatula until there are no more bits of dry flour. The dough will be very shaggy at this point and may seem too dry, but don't worry! That is how it should be!
- Cover the dough and rest for 1-4 hours. This is the autolyse stage where enzymes in the flour begin breaking down the starches and proteins.
- Pour the dissolved salt over the dough. Squeeze the dough to incorporate the water into the dough. It should feel wet and loose.
- Next, begin folding the dough. Stretch the dough and fold it in half over itself, like a dishtowel. Make four folds, giving the dough a quarter turn in between folds. Let the dough rest 30 minutes, then repeat this step. Do this a total of 6 times, every 30 minutes. The dough should slowly become smoother and more elastic as the folding continues.
- After the 6th fold, cover the dough for 30 to 60 minutes, until it looks slightly puffed. It should just be slightly larger than when you started, this is not the true proofing stage.
- Place the dough on a floured surface and split the dough into two loaves and sprinkle each with flour.
- Use a pastry scraper to shape each piece into loose rounds. This is just a preliminary shaping to prepare the dough. Slip your pastry scraper under the edge of the dough and then scrape it around curve of the dough, like turning a steering wheel. This builds surface tension in the dough.
- After each loaf is shaped, let them rest for 20 to 30 minutes to relax the gluten before the final shaping.
- Line two bread proofing baskets or mixing bowls with kitchen towels. Heavily dust them with flour - it should form a thin layer over the surface of the towel.
- Finally, you are ready to shape the loaves. Dust the dough with flour and flip it upside down, so that the floured side is against the board. Like you folded the dough earlier, grab the lip of the dough at the bottom, pull it gently up, but only fold it over onto the center of the dough, not all the way to the edge. Continue to work your way around the dough folding each part up and into the center. Repeat for the second ball of dough.
- Dust the shaped loaves with flour, then place them into the proofing baskets upside down (seam side up).
- Cover and let the dough rise at room temperature until they are nice and fluffy, about 3 to 4 hours. You can also let the dough rise overnight in the refrigerator, 12-15 hours. If you choose the overnight method, bake the loaves directly from the fridge.
- Preheat the oven to 500°F. Place two heavy-bottomed pots or Dutch ovens with lids in the oven while it preheats. It is also OK to bake one loaf after the next if you don't have two pots.
- Once the oven is preheated, remove one of the heated Dutch ovens from the oven and tip the loaf into the pot seam-side down. Repeat with the second loaf.
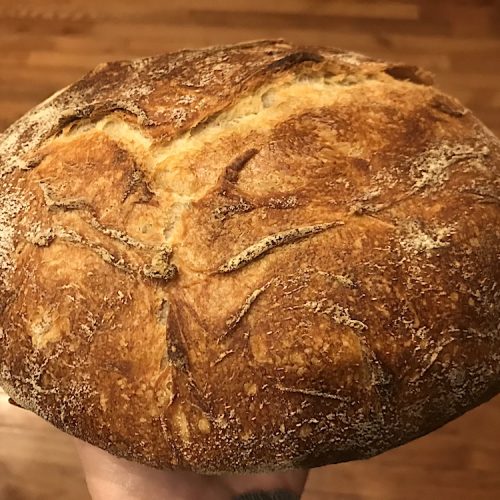
- Score the top of the loaves at an angle before placing them back in the oven with the lids on.
- Bake for 20 minutes with the lid on, then reduce the heat to 450°F and continue baking for another 10 minutes with the lids STILL ON. (No peeking!)
- Remove the lids and bake for another 15-20 minutes, until the crust is dark brown. This long baking time is where a lot of flavor and texture of the crust comes into play for the sourdough bread.
- Once cooked completely, remove the loaves from the pots using a spatula or wooden spoon and towel. Finish cooling on wire racks. Be sure they have cooled to room temperature before slicing!